Mono Print

Metallic Glue Relief

Tissue Paper Painting

Crayon Etching

Monday, August 8, 2011

Wonderful Exhibition/Two Sisters

I saw a great exhibition at The Jewish Museum in New York City, called "Collecting Matisse and Modern Masters: The Cone Sisters of Baltimore." This is a show of over fifty modern paintings that were collected by Dr. Claribel & Miss Etta Cone, including works by Matisse, Picasso, Cezanne, van Gogh and Gauguin.

At the time that these two visionary collectors amassed their collection, avant-garde art was not yet appreciated or understood by the general public. The Cone sisters acquired their art by buying directly from the artists in their Paris studios in the early 1900's, and developed professional relationships with the artists they patronized.

It's fascinating to see what the Cone sisters bought to display in their home for their own enjoyment. Of course the collection now has enormous value, and has been donated to the Baltimore Museum of Art, where the two women were raised and lived as adults.

The Exhibit will be on view at The Jewish Museum until September 25th, 2011. You won't want to miss it.

Drawing Animals: Kittens & Whales & Giraffes, Oh My!


Last week I taught a "How to Draw Animals" lesson to a group of high school students. Most of the students provided their own reference photographs to work from. Having the students copy their reference materials, would have produced acceptable results, but I wanted the students to get the most mileage out of this one-day project, and go beyond copying.

First, I discussed and demonstrated how to look for the main shapes of a subject, whether it's an object in a still life, a landscape or an animal. I advised them to look for and establish the shape of the animal's largest part first (usually its body), and draw an abstract shape, such as a rectangle or oval to approximate it. Then, keeping aware of relative size, distances apart and gesture, the other body parts could be added as general abstract shapes as well. I explained that while developing the drawing, the artists would be able to keep refining their judgements to make appropriate changes, as they gradually added detail.

Next I introduced the students to the process of working with vine charcoal and kneaded erasers on white paper toned with charcoal. First each student covered his/her paper with a layer of dark tone, using soft vine charcoal. This was smoothed over lightly with a paper towel. Then, using the same charcoal sticks, they drew the basic shapes for their animals. As the drawings progressed, I showed the artists how to use their erasers as drawing tools to "pull out" whites from the paper, and to blend grays. Erasers could also be used to add light strokes for background texture or fur. Fingers were also very useful for blending, adding and subtracting values and practically "sculpting" the darks and lights.

None of the students had used this drawing approach before, and all found it satisfyingly forgiving, effective and fun. Many of the artists were pleasantly surprised with their results, and parents and other adults were surprised at the sophisticated level of work that was accomplished in only two hours.

You can use this technique of initially toning the paper to draw an animal, a portrait, a still life, a landscape, a seascape or an abstract fantasy. Your fingers and eraser will be a mess, but you can always clean up, and I think you'll really enjoy the results.

The Students' Drawings


Saturday, July 9, 2011

Middle School Artists - Old Friends


It was great to work with three middle school students I knew from prior teaching experience, who came to the studio to paint and draw. Isabella and Olivia worked on acrylic still life paintings from observation, while Adlai drew with Conte (hard chalk) pencils, from imagination.

Isabella's painting is an inclusive composition of the studio set-up, while Olivia's is a stylized and closely cropped approach. Adlai's fascinating and skillful drawings refer to Greek and Roman warriors and mythical beasts. The studio was alive with their creativity!

It's always a privilege to observe and nurture the intellectual and artistic growth of young artists, as I did with these three maturing students. What a delight to reunite with old friends.


Mother & Daughter: Painting Together


Inwha and her daughter, Shira, each painted the same still life set up over a series of art lessons in my studio. Although they both painted from
observation, each created her own unique version of the set-up. Inwha chose to paint it in a vertical format, and Shira's was a horizontal, and their color schemes differed as well.

It's a real joy to see the successful expression of individuality in art. It's an affirmation of the multitude of ways art can be done. I couldn't help but notice how Inwha and Shira expressed genuine respect and admiration for each other's abilities and work. "Mom, how did you get that color?" "Shira, I love the color you made for the pitcher."

Brava to Inwha and Shira!


by Shira

by Inwha

Friday, July 8, 2011

Drawing/Painting - Father/Daughter


Last week, Isabella and her father, Goran, took an art lesson together at my studio. This father/daughter team have bonded over exploring the art process together for many years. While they worked with me in the studio, the respect and love they have for each other was obvious.

Isabella worked on an acrylics still life painting from observation, while Goran did a powerful charcoal drawing based on a childhood memory. They worked independently, but also supported each other's efforts, as they shared a creative moment together.

At the end of the lesson, Goran paid me a high compliment when he said, "Thank you for transporting me to a different place." Art has the potential to take us on wonderful journeys.


Friday, June 24, 2011

Summery Tube Sculptures


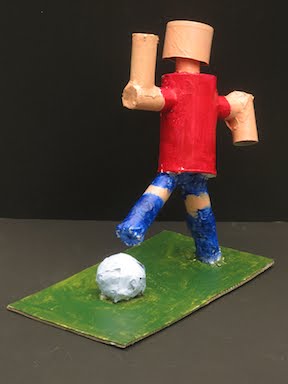
This week I taught a series of art lessons to a small group of Lower Elementary students. Our focus was on cardboard tube sculptures, and we also made colorful sun catchers and collages to welcome summer. The directions for making cardboard tube sculptures are below, and you can see how to make sun catchers in my May 15, 2011 post.

CARDBOARD TUBE SCULPTURES

Materials:

Recycled cardboard tubes from paper towels or toilet tissue
Recycled corrugated cardboard for base
Scissors
White glue
Masking tape
Acrylic gesso & an old paintbrush
Acrylic paints
Paint brushes
Water container
Assorted decorative craft items (felt, buttons, googly eyes, etc.)

Procedure:

1. Think of an invented creature, an animal, a person or a thing you'd like to make using tubes. Decide what is the biggest or main part of what you're making, and begin construction with that part. Decide if your sculpture will need a cardboard base in order to stand on its own. If your sculpture has 4 legs, it will probably stand by itself, and won't need a base.


2. Cut 1/2" long slits about 1/2" apart all around the bottom circumference of a cardboard tube. Bend the slits out to make tabs for gluing. Slits may also be cut in the ends of tubes to fit one inside the other.

3. Apply a dot of glue to each tab and press into place either on the outside of another tube or onto the base. Apply strips of masking tape over all glued tabs; long strips of tape should extend from tubes onto other tubes or onto the base. (All tape needs to stay in place and will not be removed.)

4. The next day, when the glue has set, paint a thin, even coat of white gesso over your entire sculpture, including the base, and allow to dry overnight.


5. On the following day, paint your sculpture with realistic or fantasy colors, and allow to dry again.


6. Glue on any decorative collage or craft items, such as fabric, buttons, feathers or googly eyes to make your sculpture special.

Adam made a fiery, smiley sun.

Abbey made a fantasy flower with a hovering butterfly.

Elli made a sculpture of herself playing soccer.


SUN CATCHERS

by Adam
by Abbey
by Elli

Monday, June 13, 2011

Recycled Beverage Caps: Real Wheels


Here's a fun way to recycle the small plastic lids (washed and dried) from milk or juice containers.

REAL WHEELS

Materials:
Assorted scrap mat board pieces
Watercolor paintbrush
Water container
Small clean plastic lids from milk or juice containers
Awl or sharp punch tool (to be used only by adults)
Brass fasteners, 1'' long

Procedure:
1. Using a Black Sharpie (permanent) pen, do a line drawing of a scene showing a vehicle that has wheels (car, truck, bus, bicycle, etc.). Don't draw the wheels, but do add other details to make your drawing interesting.

2. Paint your scene with watercolors, using realistic or fantasy colors. Try letting the wet colors run into each other and mix on their own. Your black lines will show through the watercolor paints. Allow to dry.

3. To make each wheel in your picture, use the awl to punch a hole in the middle of a plastic lid. Punch a hole through the mat board where the wheel will be attached. Push a brass fastener through the lid and through the hole in the board. On the back of the board, open the prongs of the fastener and flatten them against the board. Each wheel will be able to turn!

You can use other lids for anything round in your painting, such as the sun, or a clock. You can also use your Sharpie to draw details on the lids themselves. Another possibility is to make an abstract painting of any colors and designs you choose, and add turning wheels anywhere you'd like.