Mono Print

Metallic Glue Relief

Tissue Paper Painting

Crayon Etching

Friday, June 24, 2011

Summery Tube Sculptures


This week I taught a series of art lessons to a small group of Lower Elementary students. Our focus was on cardboard tube sculptures, and we also made colorful sun catchers and collages to welcome summer. The directions for making cardboard tube sculptures are below, and you can see how to make sun catchers in my May 15, 2011 post.

CARDBOARD TUBE SCULPTURES

Materials:

Recycled cardboard tubes from paper towels or toilet tissue
Recycled corrugated cardboard for base
Scissors
White glue
Masking tape
Acrylic gesso & an old paintbrush
Acrylic paints
Paint brushes
Water container
Assorted decorative craft items (felt, buttons, googly eyes, etc.)

Procedure:

1. Think of an invented creature, an animal, a person or a thing you'd like to make using tubes. Decide what is the biggest or main part of what you're making, and begin construction with that part. Decide if your sculpture will need a cardboard base in order to stand on its own. If your sculpture has 4 legs, it will probably stand by itself, and won't need a base.


2. Cut 1/2" long slits about 1/2" apart all around the bottom circumference of a cardboard tube. Bend the slits out to make tabs for gluing. Slits may also be cut in the ends of tubes to fit one inside the other.

3. Apply a dot of glue to each tab and press into place either on the outside of another tube or onto the base. Apply strips of masking tape over all glued tabs; long strips of tape should extend from tubes onto other tubes or onto the base. (All tape needs to stay in place and will not be removed.)

4. The next day, when the glue has set, paint a thin, even coat of white gesso over your entire sculpture, including the base, and allow to dry overnight.


5. On the following day, paint your sculpture with realistic or fantasy colors, and allow to dry again.


6. Glue on any decorative collage or craft items, such as fabric, buttons, feathers or googly eyes to make your sculpture special.

Adam made a fiery, smiley sun.

Abbey made a fantasy flower with a hovering butterfly.

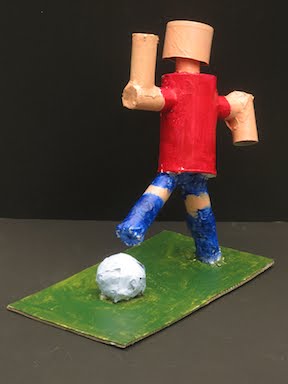
Elli made a sculpture of herself playing soccer.


SUN CATCHERS

by Adam
by Abbey
by Elli

Monday, June 13, 2011

Recycled Beverage Caps: Real Wheels


Here's a fun way to recycle the small plastic lids (washed and dried) from milk or juice containers.

REAL WHEELS

Materials:
Assorted scrap mat board pieces
Watercolor paintbrush
Water container
Small clean plastic lids from milk or juice containers
Awl or sharp punch tool (to be used only by adults)
Brass fasteners, 1'' long

Procedure:
1. Using a Black Sharpie (permanent) pen, do a line drawing of a scene showing a vehicle that has wheels (car, truck, bus, bicycle, etc.). Don't draw the wheels, but do add other details to make your drawing interesting.

2. Paint your scene with watercolors, using realistic or fantasy colors. Try letting the wet colors run into each other and mix on their own. Your black lines will show through the watercolor paints. Allow to dry.

3. To make each wheel in your picture, use the awl to punch a hole in the middle of a plastic lid. Punch a hole through the mat board where the wheel will be attached. Push a brass fastener through the lid and through the hole in the board. On the back of the board, open the prongs of the fastener and flatten them against the board. Each wheel will be able to turn!

You can use other lids for anything round in your painting, such as the sun, or a clock. You can also use your Sharpie to draw details on the lids themselves. Another possibility is to make an abstract painting of any colors and designs you choose, and add turning wheels anywhere you'd like.


Sunday, May 15, 2011

Here Comes the Sun Catcher


Here's a simple and inexpensive way to make a beautiful sun catcher. Hang it in your window in celebration of Spring and Summer, and the colors will come to life when the sunlight streams in.


SUN CATCHER

Materials:
Recycled clear hard plastic cover from a food container (yogurt)
Sharp tool (awl or sharp scissors)
Unbent paper clip, pipe cleaner or scrap of yarn or wire

Procedure:
1. Wash and dry a clear hard plastic food container cover.

2. On the outside surface of the cover, use the black pen to draw a design using many lines.

3. On the opposite side (the inside surface) of the cover, fill in the areas between the lines with a variety of colors. Use as many colors and designs as you wish.

4. Using an awl or the blade of scissors (kids should get adult help to do this safely), punch a small hole at the top of the cover.

5. Thread the paper clip, pipe cleaner or yarn through the hole & tie it off. Hang your sun catcher in a sunny window.

You can see more colorful sun catchers in my June 24, 2011 post.


A five year old made this lively sun catcher!

Thursday, April 7, 2011

Collage and Chalk


The word "collage" mean to paste; it's a work of art made by pasting or gluing objects onto a background. It's a good idea to do the pasting on a heavy piece of cardboard, so your art work won't buckle and bend when it dries. The fun part is that you can glue on so many surprisingly different things.

It's fun to experiment with combinations of materials in your art. Try making a drawing of something real or just a design, using colored chalk on dark paper. Press hard as you draw with your chalk, and your lines will really stand out against the dark colored background.

Next you can tear or cut pieces of paper to glue into the spaces between your lines, to "color in" the spaces, trying not to cover up the bold chalk lines you made. Here are some things you can use to glue in the spaces: torn or cut colored or patterned papers, yarn or string, colored tape, cardboard, buttons, old calendar pages, newspaper, wrapping paper, ribbons, magazine pictures, pieces of hand-written letters or envelopes, old movie tickets... Can you think of any other things to glue on?

Try overlapping your glued-on pieces, linking one shape to another, and allowing some colors to peek out. Pablo Picasso and Georges Braque and Kurt Schwitters were artists who made beautiful collages.

It's a good idea to keep a box of collage materials handy at home, and you can keep adding recycled papers and objects to it, as they become available. Artists have always been great "recyclers."

Wednesday, April 6, 2011

Recycled Tube Sculpture: Say hi to Perry!

This tube man's name is Perry. I love using recycled objects to make art with kids. Recently, we used various cardboard tubes from paper towel bathroom tissue rolls and oatmeal boxes to make tube sculptures.

We cut slits at about 3/4" intervals around the tops and bottoms of the tubes to fit them onto each other. We constructed the sculpture by gluing and taping the tubes together, applied gesso to the whole sculpture and painted it after it was dry. Adding on decorative papers, buttons and googly eyes made them really special. We glued and taped the sculptures to cardboard bases for sturdy support and stability.

Are you thinking about other things you could recycle to make art? Old CD's, plastic container lids, old jewel cases for CD's, old credit cards, paper grocery bags?

Saturday, March 5, 2011

"Robie" Revisited


Here's the finished version of the robot box sculpture I wrote about in an earlier post. This young sculptor made "Robie" special by adding great details after it was painted. I love the way the eyes pop out because of the light blue painted outline around the googly eyes.

When adding details such as buttons or fabric to your sculpture, it's best to use a craft glue for extra hold. I've had good results with Aleene's Original Tacky Glue. It holds collage items well, and it dries nearly clear. Also, adding line details with paint markers on top of dry painted areas can be very effective.

Wednesday, March 2, 2011

Recycled Boxes: One Cool Cat


There's more than one way to sculpt a cat! Here's the way one five year old artist used his imagination plus boxes to build a cat sculpture. At first, when he started construction, he kept joking that he made a "chair-cat," because of the flat back, head and four legs! But by the time he finished, it looked unmistakably cat-like, whiskers and all.

The whimsical colors and patterns make this sculpture unique. When you create art, think of the ways you can make your work look special. Add details and design. Add color, line and texture. Add fabric and buttons. Make your art the way nobody else would do theirs.